Transferring data between iPhones is a routine task that you’ll need to do when you get a new iPhone. In this guide, we’ll show you the 4 main ways of transferring data from iPhone to iPhone
Table of Contents
The process of transferring data from iPhone to iPhone can seem daunting, especially with the array of data types and transfer methods available. Even more so if this is your first time doing. But don’t stress, it is really easy to do once you know how.
This guide will outline the four main ways of transferring data from one iPhone to another iPhone. We’ll go through each step methodically, so you can follow along, and at the end we’ll do some troubleshooting in case you run into any issues along on the way.
Let’s do this!
What Data Can You Transfer Between iPhones?
You can transfer various types of data from your old iPhone to your new iPhone, including:
- Contacts
- Photos and Videos
- Apps and App data
- Music and other media
- Messages
- Call Logs
- Settings
- Health and Activity data
However, some data can’t be transferred like Apple Pay information, Face ID or Touch ID settings, and certain types of licensed media.
Ways to Transfer Data from iPhone to iPhone
There are four main methods from transferring data from iPhone to iPhone, and as someone that has done this more times than I care to remember, I would say that method number one – transfer data via iCloud – is the easiest.
But in order to do this method, you will have to have set up iCloud on your old iPhone and kept it updated. If you didn’t do this, you’ll have to use one of the other methods which are slightly more involved by comparison.
Also, before you start transferring data from one iPhone to another, you need to ensure you have the following things:
- Both iPhones: The old iPhone (source) from which you want to transfer data and the new iPhone (destination) where you want the data to be transferred.
- Charged Batteries: Make sure both iPhones are sufficiently charged. If they’re not, the transfer process could be interrupted, which can lead to data loss.
- Wi-Fi Connection: A strong, stable Wi-Fi connection is needed for most data transfer methods, especially if you’re using iCloud or Quick Start.
- Apple ID and Password: You’ll need your Apple ID and password to log in to your iCloud account or to authenticate the transfer process.
- Enough Storage Space: The new iPhone should have enough storage space to accommodate the data being transferred from the old iPhone.
- iTunes or Finder on Computer (Optional): If you’re planning to use the iTunes/Finder method, you need a computer with the latest version of iTunes (for Windows and macOS versions prior to Catalina) or Finder (for macOS Catalina and later).
- Lightning Cables (Optional): If you’re using the iTunes/Finder method or a third-party software, you’ll need lightning cables to connect your iPhones to your computer.
- Third-party Software (Optional): If you’re using a third-party app to transfer data, ensure it is installed on your computer.
Once you’re confident you have all of these things on your person, you can crack on with the data transfer using one of the methods detailed below.
Method 1: Transfer data using iCloud
- On your old iPhone, go to Settings > [Your Name] > iCloud.
- Enable the types of data you want to transfer.
- Tap iCloud Backup > Back Up Now.
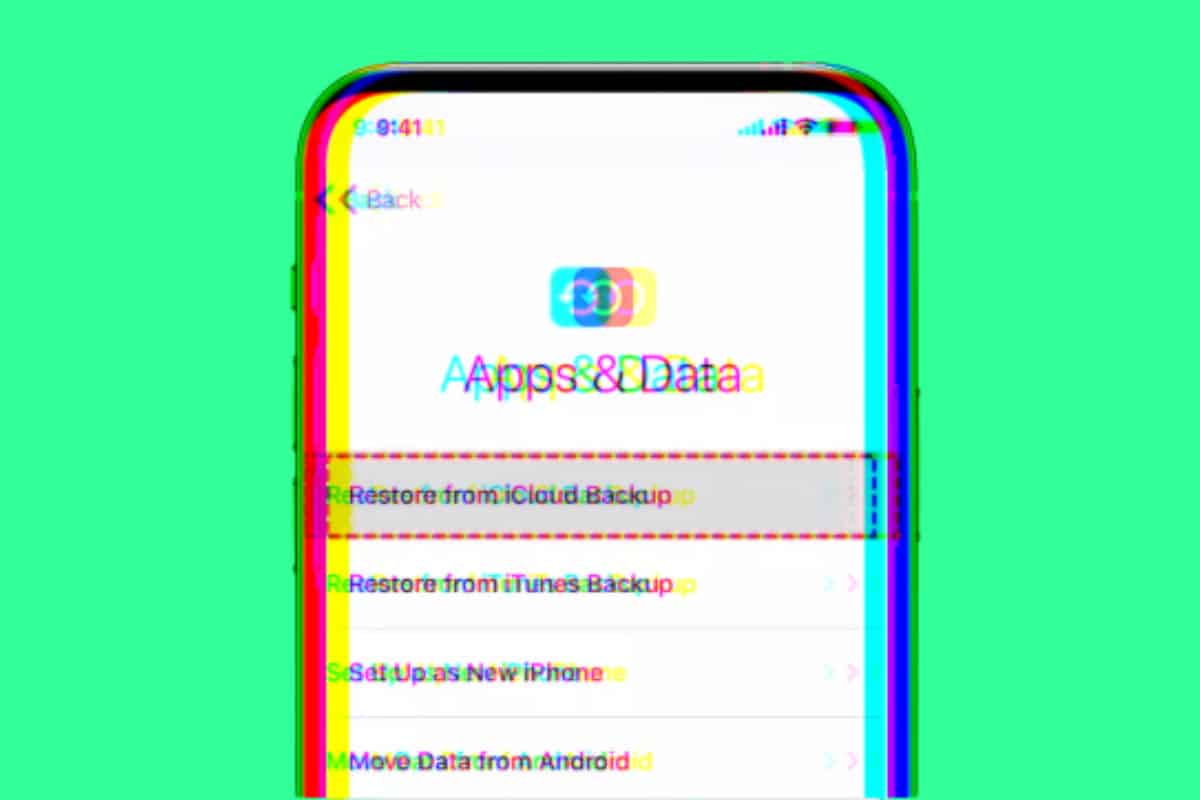
- On your new iPhone, during setup, choose Restore from iCloud Backup.
Method 2: Transfer data using iTunes
- Connect your old iPhone to your computer and open iTunes.
- Select your device and click Back Up Now.
- Disconnect your old iPhone, then connect your new one.
- In iTunes, choose Restore Backup.
Method 3: Transfer data using Quick Start
- Bring your new iPhone close to your old one.
- Follow the onscreen instructions.
- Choose Transfer from iPhone to import data wirelessly.
Method 4: Transfer data using third-party software
There are numerous third-party apps available for this – we like Dr.Fone the most. The process typically involves connecting both iPhones to a computer, selecting data to transfer, and initiating the transfer.
Things to Consider Before Transferring Data
The first and most crucial thing to consider before transferring data from one iPhone to another is backing up your data.
Data transfer isn’t usually problematic, but things can sometimes go wrong, leading to data loss. To mitigate this risk, ensure that you have a recent backup of your data.
You can back up your data using iCloud, iTunes, or a reliable third-party application. This way, even if something goes wrong during the data transfer, you can always retrieve your data from the backup.
Available Storage Space
Another key factor to consider is the available storage space on your new iPhone. The amount of data you can transfer is directly dependent on this.
If the new iPhone doesn’t have enough space to accommodate all the data from the old iPhone, you will need to make some decisions. You might have to exclude some data from the transfer or use other means (like cloud storage or external storage devices) to store some of your files.
Internet Connectivity
If you’re planning to use methods such as iCloud or Quick Start, a stable and robust internet connection is crucial.
The data transfer process involves uploading data to the cloud and downloading it to the new device. If your internet connection is slow or unreliable, it could lead to a lengthy, frustrating transfer process or even cause the process to fail.
Security and Privacy
If you’re opting to use third-party software for data transfer, it’s essential to consider the security and privacy implications.
Be sure to use reputable software that values user privacy and uses secure methods for data transfer.
Device Compatibility
Finally, consider the compatibility of the devices involved. If the new iPhone is significantly newer than the old one, it may have features or settings that were not present on the old device.
In contrast, if the new iPhone runs an older version of iOS, some data from the more recent device may not be fully compatible. It’s important to update your devices to the latest iOS version they can support to minimize compatibility issues during the transfer.
Troubleshooting Common Transfer Issues
Common problems include incomplete transfers and software glitches. Restarting devices, updating software, and trying alternative transfer methods usually resolve these issues.
Alternative Methods to Transfer Data
You can use AirDrop for sharing specific items, email or messaging apps for small amounts of data, or external storage devices for media files.
How to Transfer Data from iPhone to iPhone with Different iOS Versions
Transferring data from an older iPhone to a newer one typically involves backup and restore procedures, while moving data from a newer iPhone to an older one might require additional steps like updating the older iPhone’s iOS or using third-party software.
My advice? Make sure both of your iPhones are running the most up to date version of iOS. If that isn’t possible, use a third-party application like Dr. Fone – it will get around these issues without too many headaches.
Tips and Tricks for a Successful Data Transfer
OK, that’s pretty much everything you need to know about transferring data from one iPhone to another iPhone. In order to wrap things up properly, here’s a selection of PRO TIPS to keep in mind before, during, and after you start transferring data from one iPhone to another:
- Firstly, always backup your data before initiating any transfer process. Backups can be done via iCloud, iTunes, or reliable third-party software. This is a crucial step as it ensures your data is safe, even if something goes wrong during the transfer.
- Next, it’s important to ensure that both your devices are updated to the latest iOS version they can support. This not only ensures smoother data transfer but also minimizes compatibility issues.
- Ensure both your devices are charged adequately, preferably more than 50%, before starting the transfer. The data transfer process can consume a significant amount of battery, and you don’t want your devices to power off in the middle of it.
- A stable Wi-Fi connection is vital for a successful data transfer, especially if you’re using iCloud or Quick Start. These methods involve data being uploaded and downloaded via the internet. A poor or unstable internet connection can cause the transfer process to be sluggish, or worse, fail altogether.
- Ensure your new iPhone has sufficient storage space to accommodate the incoming data. If the storage space is insufficient, the data transfer will not complete. In such cases, consider purchasing more iCloud storage or using alternative storage solutions like external drives or other cloud storage services.
- If you are using iTunes or third-party software for data transfer, use reliable lightning cables to connect your iPhones to your computer. Poor-quality cables can cause intermittent connections, leading to failed transfers.
- Lastly, be patient. Data transfer, especially large amounts of data, can take time. It’s tempting to use your device during the transfer, but refrain from doing so. Using the device can slow down the transfer process or cause it to fail.
Buying tools
Thinking About Buying an iPhone?
Compare current refurbished prices, see how it stacks up against alternatives, and avoid overpaying for the wrong model.
Recommended for this article