Whether you’re running an iMac or a MacBook, or an Intel or an M1 Mac, the snipping tool works exactly the same – here’s how to use it…
Apple’s Mac computers come with many handy features, but if you work online and create a lot of stuff for either publication inside blog posts or for sharing with work colleagues and/or friends and family, getting acquainted with the Mac’s snipping tool is a must.
The snipping tool on Mac is basically a way to do a screengrab – or a screenshot if you will. In Windows, you use the Print Screen function. But the way it is done on Mac is way simpler and far more useful, allowing for better accuracy and less post-capture editing. You get exactly what you need right away.
How To Use Snipping Tool on Mac
In order to use the snipping tool on Mac, you will first need to know how to activate it. There are a few ways to activate the snipping tool on Mac, and they all involve learning some simple keyboard commands – don’t worry, they’re really easy to remember.
Out of all the methods for snipping on Mac, my preferred method, meaning, the one I use about 10 times a day, is the standard snipping/screengrab tool. It is easy to use and allows for a high degree of accuracy when selecting what you want to capture.
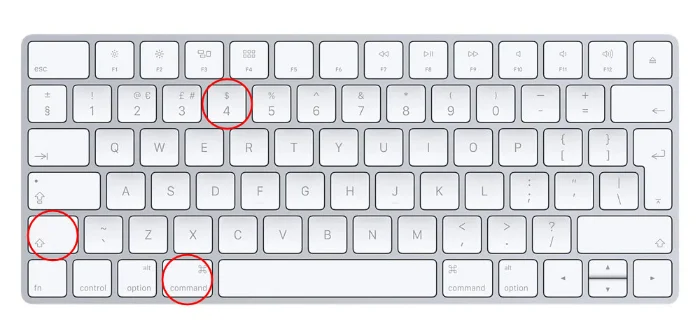
Thankfully, this method for snipping on Mac is really simple too. Just follow these steps: on your keyboard simply press and hold SHIFT + COMMAND + 4.

This will switch your mouse cursor into a capture tool. Next, drag your mouse around the desired area on your screen. You’ll then hear a camera shutter sound and the captured image will be saved to your desktop.
Other Ways To Use Snipping Tool on Mac
I mentioned above that there are additional methods for activating and using the snipping tool on Mac. In order to cover every possible use case, let’s now look at these additional snipping tool methods.
Alternative Snipping Tool Commands
- Shift + Command + 3 – this one will quickly take a screenshot of your entire screen; think of it as the Mac’s answer to Print Screen. From here, you can then edit the image to highlight certain points or windows/apps contained inside the image.
- Shift + Command + 5 – this method for snipping on Mac is the most advanced and gives you the most options. When you select Shift + Command + 5, it will bring up the Snipping Tool control panel. In here you can select a specific area to snip, record what’s on your screen, and even set a timer for recording videos.
If you want to record what’s on your Mac’s screen, you will need to use Shift + Command + 5 – this gives you full control of everything, including what you want to record, based on open applications and windows, as well as full access to Mac’s Snipping Tool for capturing images of what’s being displayed on your screen.
Where Are Snipping Tool Images / Videos Saved?
By default, any image that is created using Mac’s Snipping Tool will be saved to your desktop. You can change the location of where the images are saved by using the advanced snipping tool app when you use the Shift + Command + 5 command. Me? I just keep mine saved to my desktop. I can always find them this way and quickly delete them after I’m done with them, reducing clutter on my system.
If you just want to capture screenshots on your Mac, you’re best using the SHIFT + COMMAND + 4 method. It allows for the greatest degree of accuracy and is the simplest to remember – it is also the least fiddly by a long shot, as it doesn’t require anything else other than accurate selection. Once you’ve done that, your snipped image is saved to your desktop.
For more advanced stuff, things like recording your screen, you’ll need to use the Shift + Command + 5 method. This will give you full control over things like screen recording, snipping, and where a snipped image or recorded screen video is saved. Again, this tool is VERY useful, especially if you have to make a lot of how-to videos about how to do things on Mac or use certain types of software.
Is Mac Snipping Tool Better Than Windows’ Version?
Having used both Apple and Microsoft’s Snipping Tools, I do tend to find the Mac way of doing things easier. Once you have the commands down – Shift + Command + 5, Shift + Command + 3, and SHIFT + COMMAND + 4 – you’re basically free to capture screenshots, print screen, and record videos of your workflows. And, all of these can be quickly edited too.
You don’t need to worry about where they’re saved either; macOS automatically saves everything you do with its Snipping Tool to your desktop, so they are easily accessible. As a tool, the Snipping Tool on Mac is really useful. I use the Snipping Tool every day, multiple times, and I couldn’t imagine my workflow without it.
And check out What We Know About The Upcoming 15-Inch MacBook Air!


