How To Record Screen on Mac (With Audio): macOS’ 3 Main Options…


How To Record Screen on Mac (With Audio)Pin

If you’re looking to record your screen on Mac – and you want audio as well – this is the guide you’ve been looking for…


If you’re using a Mac – either a MacBook, iMac, or a Mac Studio – there are a couple of ways to screen record. If you’re using Chrome, for instance, you can just download Vidyard, a free screen recording tool. If you’re using Safari, you’ll need to use Apple’s baked-in method for screen recording.

Apple gives you two potential ways to do screen recording in macOS, either via its native Snipping Tool or with QuickTime. We’ll take a look at both of these options below. But if you want the simplest and easiest way to record screen on Mac, I’d just advise you to download Chrome and use Vidyard – it is 100% free and super easy to use. I use Vidyard all the time.

How To Record The Screen on Your Mac

If you don’t want to use Chrome for whatever reason, even though Chrome is now faster than Safari, you’ll have to use macOS’ native screen record tool. As noted above, there are two distinct methods for recording your Mac’s screen available to you in macOS.

Method #1 – Using macOS’ Snipping Tool To Screen Record

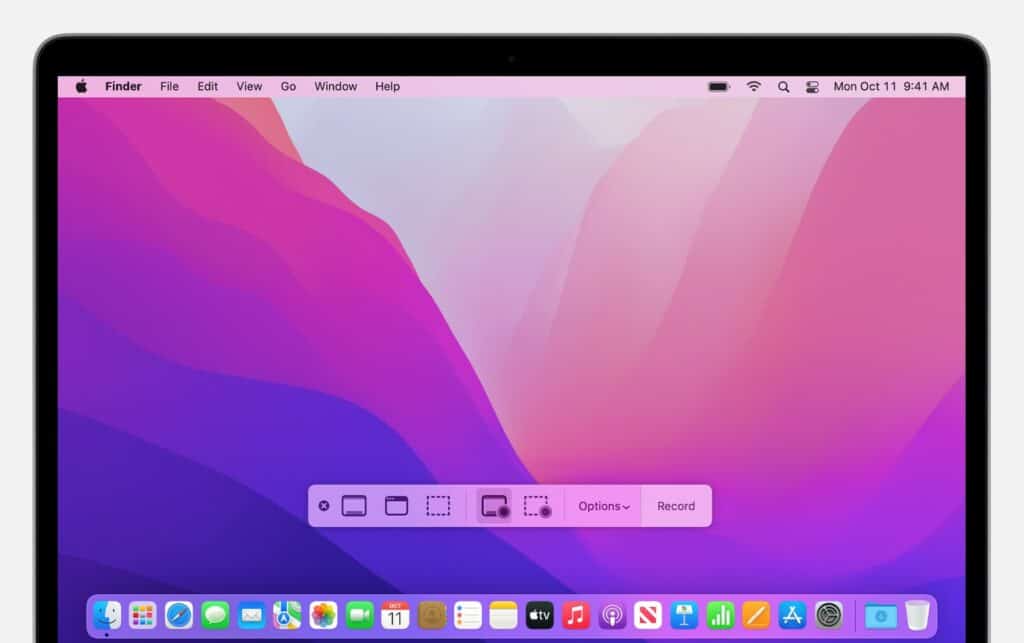
The first way to record screen in Mac requires that you active macOS’ Snipping Tool. To do this enter the following command: SHIFT + COMMAND + 5 – this will open the snipping tool. From here, you can select the part of the screen you want to record. All you have to do now is hit record and macOS will start recording.
How To Record Screen on Mac With AudioPin
This is what the Snipping Tool looks like inside macOS. Using this toolbar, you can select what part of the screen you want to record, whether you want audio or not, and also cancel and start the recording by tapping the RECORD button on the right. To access this toolbar, enter the keyboard command: SHIFT + COMMAND + 5

If you need audio, on the controls at the bottom of your screen, tap OPTIONS and select BUILT-IN MICROPHONE. This will then instruct macOS to use your Mac’s built-in microphone to record audio while you’re making a screen recording. This is great if you’re making instructional videos for YouTube, Instagram, or members of your work team.

Method #2 – Using QuickTime To Screen Record

The second method for screen recording on Mac is a little more involved and, if I’m honest, I’d probably just stick to Method #1. But for the sake of clarity, let’s go over how you screen record on Mac using QuickTime.

First, you’ll need to open QuickTime from your Applications folder. Next, open FILE and then select NEW SCREEN RECORDING. The onscreen controls for screen recording should now appear. All you have to do now is tap the RED BUTTON to start recording. And if you want audio, click the arrow next to RED BUTTON and select INTERNAL MICROPHONE.

Simple, right? From here, you can create as many screen recordings as you like. When your screen recording is done, simply tap the RED BUTTON again to stop it. You can then save the file and QuickTime will then give you a bunch of options – share, edit, save – for what to do with it.

QuickTime will automatically save your screen recording, it will add it to your desktop, and if you forget to name the file it will be given the following name: “Screen Recording date at time.mov”. This is the same for screen recordings made using METHOD #1 as well, so if you need to locate your screen recording, remember, it will ALWAYS be located on your desktop.

Best Way To Record Screen on Mac?

Both QuickTime and Apple’s Snipping Tool do the same, screen record. They just go about it in different ways. Personally, I tend to use METHOD #1 the most – the one you access with the keyboard command SHIFT + COMMAND + 5. I just find this method the quickest. I hit the command, make the video, and, BOOM, it is saved to my desktop.

If you’re using Chrome on your Mac, however, I would definitely check out Vidyard. It is a free Chrome extension that’ll let make screen recordings from your browser. It works great, has plenty of useful features, and it also records audio. It also has a nifty tool that lets you know when your screen recording has been viewed which is handy if you’re disseminating videos to your work colleagues.

And if you’d like to learn more about Apple’s macOS Snipping Tool, be sure to check out our extensive guide on how to use the Mac’s Snipping Tool – it covers everything you need to know.

And check out What We Know About The Upcoming 15-Inch MacBook Air! Also, check out What We Know About Apple’s Hardware Subscription Service! And also check out How To Use macOS’s Launchpad: Get The Most Out Of The Mac’s Application Launcher!

Latest Smartphone Releases


  • Xiaomi 15S Pro

    The Xiaomi 15S Pro didn’t come with a flashy launch, but it brings some seriously heavy hardware to the table. A custom 10-core chip, Leica-engineered cameras, and one of the brightest displays on the market

  • Samsung Galaxy S25 Edge

    At just 5.8mm thick, it’s one of the thinnest Android phones ever made—but don’t let the slim profile fool you. This phone is all flagship under the hood.

  • Nothing Phone (3a) Pro

    It’s got the same slick design and OLED display, but adds a periscope zoom camera and a 50MP front-facing shooter.

  • Nothing Phone (3a)

    The Nothing Phone (3a) nails the formula: give people what they actually want, keep the price low, and make it look cooler than anything else in its class.

  • Motorola EDGE 60 Pro

    With a bold design, flagship-like display, and surprisingly refined camera system, it’s one of the most interesting mid-range phones of 2025.

  • Google Pixel 9

    I’ve been using the Pixel 9 for a few weeks now, and honestly? It nails all the basics—and a bit more. Killer stuff all round!

  • Google Pixel 9 Pro

    I’ve used the Pixel 9 Pro as my daily device, and it’s hands-down the best balance of power, practicality, and photography you’ll find on Android right now.

  • OnePlus 13

    I’ve been using the OnePlus 13 as my daily driver for a few months now—and I’ve got to say, it’s easily one of the best Android phones I’ve tested this year.

  • Xiaomi 15 Ultra

    After using the Xiaomi 15 Ultra for over a week, I can confidently say: this phone is an absolute beast. It’s made for camera nerds, power users, and creators.

  • iPhone 16 Pro Max

    If you’ve been holding out for a truly complete iPhone, the 16 Pro Max delivers—hard. After using it daily, I won't be going back…

  • Google Pixel 9 Pro XL

    Big screen, big battery, and even bigger brains—this is the Pixel to get if you want Google’s best hardware and longest support.

  • Google Pixel 9a

    The Pixel 9a brings Google’s flagship-level smarts to a budget-friendly package, and it’s easily one of the best-value Android phones of 2025.

Best SIM-Only Plans & Deals


  • Boost Mobile Unlimited Premium Plan

    Boost’s top-tier option brings the heat: 50GB of premium data, hotspot, North America roaming, global talk & text, and $430 off select devices. All-in at $60/month with no contract.

    +

    Data: Unlimited (50GB premium speed)

  • Boost Mobile Unlimited+ Plan

    Level up with 40GB of premium data, hotspot access, global calling, and up to $300 in device savings. All for just $50/month. No contracts and flexible phone options included.

    +

    Data: Unlimited; Speed Caps After 40GB

  • Boost Mobile Unlimited Plan

    Start strong with 30GB of premium data, unlimited everything, and a killer intro offer: just $15/month for the first 3 months, then $25/month forever. No contracts. No fluff. Big value.

    +

    Data: Unlimited (Speed Caps Over 30GB)

  • iD Mobile 1 Month SIM-Only: 108GB

    Another high-data, low-cost option with no contract. 108GB for just £9, full 5G access, and the same goodies you get with 12-month deals.

    +

    Data: 108GB

  • iD Mobile 1 Month SIM-Only: 20GB

    The lowest price option. 20GB for £6 with all the same perks as pricier plans. Great if you don’t use much data and want to save every penny.

    +

    Data: 20GB

  • iD Mobile 1 Month SIM-Only: 110GB

    This plan gives you big data and zero commitment. 110GB for just £10 with all perks intact. If you need more data but want the freedom to cancel, this is the one.

    +

    Data: 110GB

  • iD Mobile 1 Month SIM-Only: 60GB

    More data, same price. For just £8/month, you get 60GB on a no-strings 1-month rolling plan. Ideal for users who stream often but don’t want long commitments.

    +

    Data: 60GB

  • iD Mobile 1 Month SIM-Only: 40GB

    Perfect if you want full flexibility. You get 40GB and all of iD Mobile's perks with no lock-in, annual increases, or setup fees. Great for short-term users.

    +

    Data: 40GB

  • iD Mobile 12 Month SIM-Only: 60GB

    One of the best pound-per-GB plans around. You get 60GB for £8 with £25 cashback, which means you’re effectively paying closer to £6/month. Includes roaming and data rollover.

    +

    Data: 60GB

  • iD Mobile 12 Month SIM-Only: 108GB

    This deal gets you a healthy 108GB of 5G data for less than a tenner, with no upfront costs and £24 cashback. All the perks are included too: data rollover, roaming, and loyalty rewards.

    +

    Data: 108GB

  • iD Mobile 12 Month SIM-Only: Unlimited Data

    This iD Mobile plan doesn’t just compete on price, it’s up there with the best of them. Unlimited everything, a year-long lock-in with no price rises, and £42 cashback straight to your pocket. It’s like getting nearly 3 months free.

    +

    Data: Unlimited, No Speed Caps

  • Mint Mobile 20GB Plan

    If you're looking to save some cash on your bills, this plan is an awesome option. You'll get 20GB of data per month and 20GB hotspot data allowance. For moderate to heavy users, that should be more than enough. I seldom use more than 10GB of data a month, and I'm always using my phone

    +

    Data: 20GB