Here’s a complete guide – including some additional tips and tricks – on everything you need to know about how to set timer on iPhone camera…
Table of Contents
By using the built-in timer, you’ll never have to worry about rushing to get in the shot or finding someone else to take the picture for you. This post will guide you through the simple process of setting a timer on your iPhone camera, ensuring you’re ready to snap memorable moments without any hassle.
In just a few taps, you can easily set a timer to delay the camera shutter, giving you ample time to position yourself and get ready for the photo. Whether you need a quick 3-second countdown or a longer 10-second delay, the iPhone’s camera timer has you covered.
On top of this basic stuff, in this guide you’ll also learn how to enhance your iPhone photos using features such as focus and exposure adjustments, flash settings, filters, and grid lines.
How to Set Timer on iPhone Camera
Setting a timer on your iPhone camera can be extremely useful when you want to take a group photo or a selfie without having to hold the phone.

In this section, we will guide you through the process of setting the timer on your iPhone camera.
Choosing the Timer Length
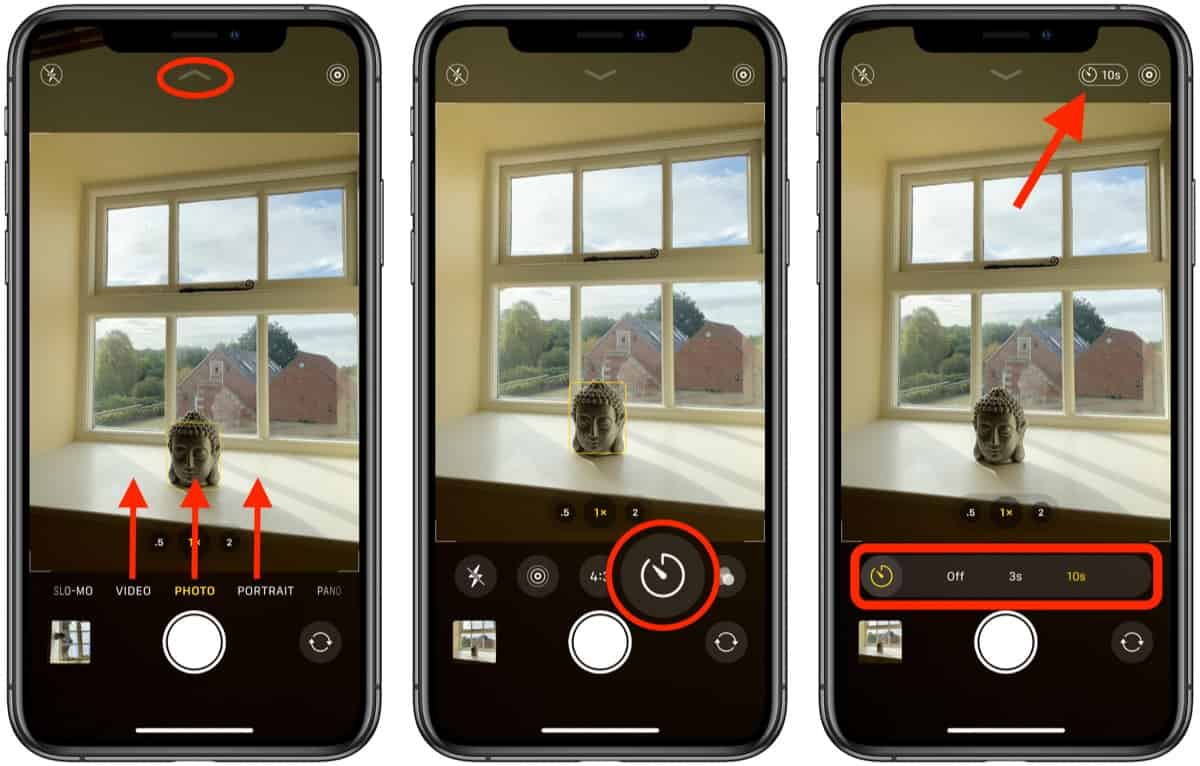
The first step in setting a timer on your iPhone camera is to choose the length of time you want the timer to run for. The timer length can be set to either 3 seconds or 10 seconds.
- To set the timer to 3 seconds, open the Camera app and tap on the Timer icon (looks like a stopwatch).
- Tap on the 3s option.
- To set the timer to 10 seconds, open the Camera app and tap on the Timer icon (looks like a stopwatch).
- Tap on the 10s option.
Starting the Timer
Once you have selected the timer length, you are ready to start the timer.
- Open the Camera app and select the photo mode you want to use (portrait, landscape, etc.).
- Position your iPhone camera where you want it to be.
- Tap on the Timer icon (looks like a stopwatch).
- The timer will begin counting down from the selected time (3 seconds or 10 seconds).
- Once the timer reaches zero, the camera will take the photo.
Now you know how to set a timer on your iPhone camera. Start using this feature to take amazing group photos and selfies without having to hold the phone.
Benefits of Using a Timer on Your iPhone Camera

Using a timer on your iPhone camera has numerous benefits that can help you create better photos. Whether you’re taking group photos, selfies, or night photography, using a timer can help you take your photography skills to the next level.
Group Photos
When taking group photos, it’s essential to ensure everyone is in the frame, and no one is left out. Using a timer can help you achieve this by giving you enough time to position yourself in the frame and ensure everyone is in the shot. Additionally, when taking group photos, you might need to place your iPhone on a stable surface to avoid shaky images. A timer gives you enough time to set up your iPhone on a tripod or any other stable surface and ensure you capture a perfect shot.
Selfies
Selfies are an excellent way to capture and share your moments with friends and family. However, taking selfies can be challenging, especially when you need to hold your iPhone with one hand. Using a timer can help you take perfect selfies by giving you enough time to position your iPhone correctly and take a steady shot. You can also take selfies from various angles and positions using a timer and capture the perfect shot.
Night Photography
Taking photos at night can be challenging, mainly due to low light conditions. Using a timer can help you take excellent night photos by giving you enough time to set up your iPhone correctly. Additionally, when taking night photos, you might need to use a tripod to avoid shaky images. A timer gives you enough time to set up your iPhone on a tripod and take steady shots, resulting in better night photos.
Using a timer on your iPhone camera is essential, and it can significantly improve your photography skills. Whether you’re taking group photos, selfies, or night photography, using a timer can help you take your images to the next level. So, the next time you’re taking photos, consider using a timer and see the difference it makes.
Using the Timer with Other Camera Features
When taking photos with your iPhone camera, you have access to a variety of features that can help you capture the perfect shot. In addition to adjusting focus and exposure, you can also utilize filters, grid lines, and the timer feature.
Filters
Using filters can add a unique touch to your photos. To apply a filter, open the Camera app and select either the Photo or Portrait mode. On iPhone XS, XR, and later, tap the filter icon and choose from the available options. On iPhone X and earlier, tap the three overlapping circles icon at the top of the screen and swipe left or right to preview filters. Choose a filter by tapping on it.
Grid Lines
Grid lines can help you align and compose your shot. To turn on grid lines, go to Settings > Camera and toggle on the Grid option. The grid lines will appear on the camera screen.
Adjusting Focus and Exposure
You can manually adjust the focus and exposure of your shot by tapping on the camera screen. This will bring up the automatic focus area and exposure settings. Tap where you want to move the focus area and then drag up or down next to the focus area to adjust exposure.
The Timer Feature
The timer feature allows you to set a delay before your photo is taken. This can be useful for capturing group shots or selfies. To set the timer, open the Camera app and tap the timer icon. Choose either a 3-second or 10-second delay and then tap the shutter button to start the timer.
Using these features in combination can help you take stunning photos with your iPhone camera. Experiment with different settings and see what works best for your shots.
Wrapping Up…

Setting a timer on your iPhone camera can be extremely useful when you want to take a photo of yourself or with a group of friends. By using the timer, you can ensure that everyone is ready and in position before the photo is taken.
To set a timer, simply open the Camera app and tap the timer icon. You can choose a 3-second or 10-second timer, depending on your needs.
Additionally, you can use the grid feature to help you straighten and compose your shots. By following these simple tips, you can improve the quality of your iPhone photos and take your photography to the next level.
For more iPhone camera tips and tricks, check out our complete guide to iPhone photography basics.


