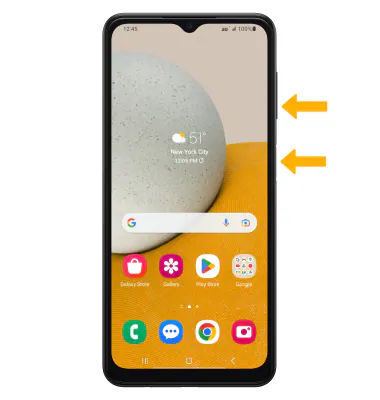
Here’s the quickest and simplest way to take a screenshot on Samsung Galaxy Core Prime, including where it goes once it is taken and what you can do with it afterwards (sharing options and editing)
Taking a screenshot on your Samsung Galaxy Core Prime is not just convenient; it’s a skill that can prove invaluable in various situations. Whether you’re capturing a memorable text conversation, documenting a technical issue, or saving a recipe for later, knowing how to take a screenshot is essential.
In this guide, we’ll walk you through the simple yet effective methods to capture a screenshot on your Samsung Galaxy Core Prime.
Screenshot on Samsung Galaxy Core Prime
Method 1: Hardware Buttons

- Step 1: Locate the Buttons: First, locate the “Volume Down” and “Power” buttons on your device. These are usually on the right side of the phone.
- Step 2: Press and Hold: Press and hold both buttons simultaneously for about 1-2 seconds.
- Step 3: Release and Confirm: Release the buttons when you hear a shutter sound or see a flash on the screen. You’ll also see a screenshot notification in the notification bar.
Expert Tip: Timing is crucial. If you hold the buttons for too long, you might trigger other functions like powering off your device.
Method 2: Palm Swipe Gesture
- Step 1: Enable the Feature: Go to “Settings” > “Advanced Features” > “Motions and Gestures” and enable “Palm swipe to capture.”
- Step 2: Perform the Gesture: Place the side of your palm on the edge of the screen and swipe across it.
- Step 3: Check the Screenshot: You’ll hear a shutter sound and see a screenshot notification, just like in the first method.
Note: This method may require some practice to get right.
Method 3: Using Assistant Menu
- Step 1: Activate Assistant Menu: Navigate to “Settings” > “Accessibility” > “Interaction and dexterity” > “Assistant Menu” and turn it on.
- Step 2: Customize Menu: Add the “Screenshot” option to the Assistant Menu.
- Step 3: Use the Menu: Tap the Assistant Menu icon on your screen and select “Screenshot.”
Real-World Example: This method is particularly useful for people who find it difficult to use hardware buttons due to accessibility issues.
What’s Next?
Congratulations! You’ve mastered the fundamentals of taking screenshots on your Samsung Galaxy Core Prime. But let’s be honest, that’s just the tip of the iceberg. Screenshots are more than just capturing your screen; they can be edited, shared, and managed in various ways that can significantly enhance your user experience.
In this section, we’ll dive deeper into these advanced functionalities, providing you with actionable tips to maximize the utility of every screenshot you take. Ready to level up your screenshot game? Let’s dive in.
Advanced Tips for Editing and Sharing

Editing on the Fly
Right after you capture a screenshot, a notification will pop up on your screen. This isn’t just an alert; it’s an invitation to edit. Tap on it, and you’ll be presented with a range of editing options, from cropping to adding text or doodles. This immediate access to editing tools allows you to make necessary changes without having to dig through your gallery.
Instant Sharing Capabilities
The same notification that offers editing options also provides a shortcut for sharing. With just a tap, you can send your screenshot via multiple platforms—be it WhatsApp, Email, or any social media channel. This is a time-saver, especially when you need to share information quickly.
Where Are Your Screenshots Stored?
Knowing how to take a screenshot is one thing, but knowing where it’s stored is another. By default, your Samsung Galaxy Core Prime organizes your screenshots in a dedicated “Screenshots” folder within the “Gallery” app. This makes it incredibly convenient for you to revisit, edit, or share them at a later time.
But what if you’re a power user who prefers manual file management? You’re covered. Your screenshots are also accessible through the “My Files” app. Navigate to “Internal Storage,” then proceed to the “Pictures” folder. Inside, you’ll find another folder labeled “Screenshots,” housing all your screen captures.
File Management and Backup
The “My Files” app offers more than just viewing; it provides options to move or copy your screenshots to other locations, including external storage like a microSD card. This is invaluable if you’re running low on internal storage or wish to create backup copies. Moreover, you can effortlessly transfer these screenshots to your computer by connecting your phone via a USB cable and locating the “Screenshots” folder.
Conclusion
Capturing a screenshot on your Samsung Galaxy Core Prime is straightforward, but mastering the art involves understanding the additional features at your disposal. Whether you’re a fan of the hardware buttons, enjoy the palm swipe gesture, or find the Assistant Menu more accessible, each method has its unique advantages and limitations. Choose the one that aligns with your needs.
Final Note: Always exercise digital etiquette. Capturing and sharing screenshots of sensitive or private information without consent is not just unethical; it could be illegal.
You’re now not just capable but proficient in taking, editing, and managing screenshots on your Samsung Galaxy Core Prime. Go ahead, capture away!


