Here’s a quick and simple guide all about How to turn on Night Mode inside your iPhone camera, alongside some super-actionable tips and tricks for when you’re using it…
Table of Contents
Ever tried to capture a stunning night skyline or a serene moonlit landscape, only to end up with a dark, grainy image? Enter Night Mode, a game-changing feature on your iPhone camera that’s designed to turn those low-light photography woes into wow moments.
And if you’re using a Pro or Pro Max phone like the iPhone 13 Pro Max, you’ll really notice a huge difference in overall photography performance as well as with things like Night Mode.
Let’s dive into the world of iPhone Night Mode and learn how to use it to create breathtaking low-light photos.
What is Night Mode?
Night Mode launched on iPhone 11, as did the ability to add and remove the camera app from your iPhone’s lock screen. Night Mode uses intelligent software algorithms and the A13 Bionic chip (or newer) to dramatically improve photos taken in low-light environments.

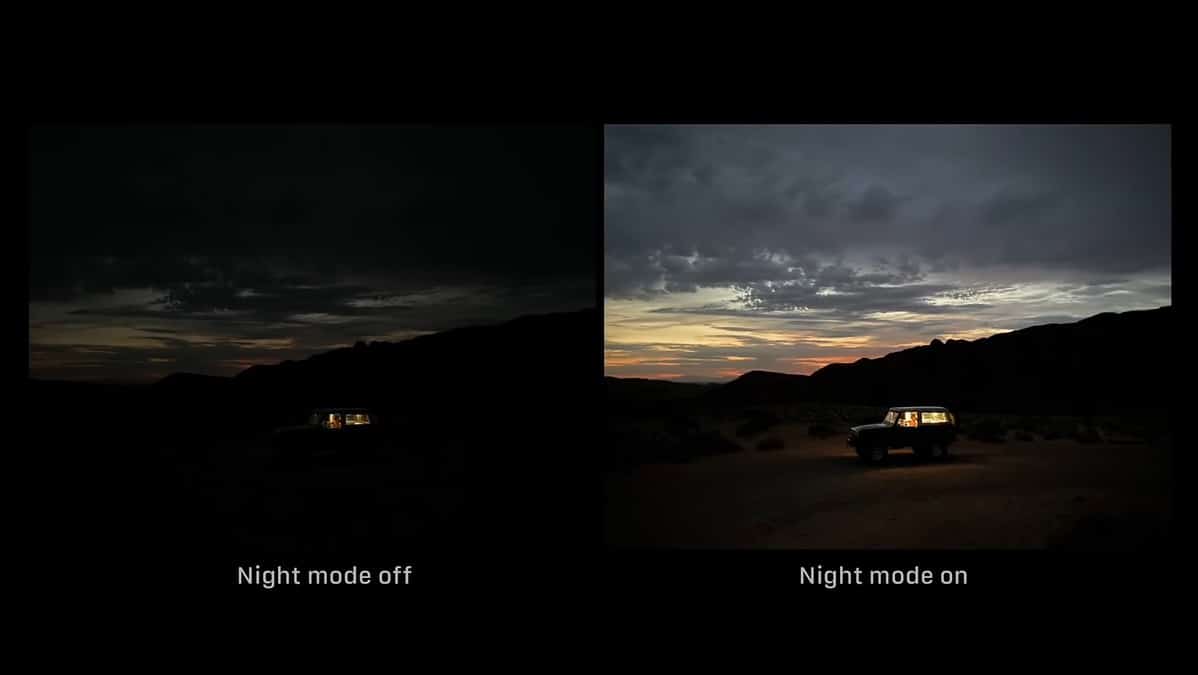
Here’s a quick example of what night mode can do. As you can see in the image, the detail present when Night Mode is switched on is incredible compared to shooting without it. You can use Night Mode outside, inside, or anywhere where there is low light.
It extends the shutter speed, allowing more light to reach the sensor and brightening the image without losing clarity or introducing noise. The result? Stunning low-light photos that were previously impossible to capture on a smartphone.
Turning on Night Mode
Night Mode is designed to activate automatically when your iPhone detects low-light conditions. But if you want to take control and manually adjust the settings, here’s how:
- Open the Camera app on your iPhone.
- Swipe to the Photo mode.
- If Night Mode is available, you’ll see the Night Mode icon (a moon) at the top left corner of the screen. If it’s not showing, it means your iPhone thinks there’s enough light.
- Tap on the Night Mode icon. This will bring up a slider at the bottom of the viewfinder.
- Drag the slider to the right to increase the exposure time, which will brighten the photo. Be aware, though, that longer exposure times require you to keep your iPhone steady for longer to avoid blur.
Pro Tips for Night Mode Photography
- Steady Does It: Night Mode uses longer exposure times, so keeping your iPhone steady is crucial. Use both hands, lean against a wall, or better yet, use a tripod.
- Play with Light Sources: Streetlights, neon signs, lit windows – they can all serve as interesting light sources in your Night Mode photos. Experiment with different angles and positions.
- Use the Timer: To avoid any shake from pressing the shutter button, use the timer. Even a two-second delay can make a difference.
- Experiment with Exposure: Don’t be afraid to manually adjust the Night Mode exposure time. Sometimes, underexposing the shot can create a more realistic and dramatic night-time image.
Should You Use Night Mode?
Night Mode is a powerful tool; it’s like having a portable photography studio in your pocket, ready to turn those challenging low-light scenes into stunning images. So, next time you find yourself in a dimly lit environment, don’t shy away from Night Mode. Embrace the darkness, switch on Night Mode, and you’ll see what a massive difference it makes to your shots.
And if you’re struggling with blurry images on your iPhone, check out our detailed guide on how to fix blurry images on iPhone – it covers off all the most common culprits.


