Here’s a quick and simple guide on how to remove the camera from your iPhone lock screen – it’s quick, simple, and only takes a few steps…
The iPhone lock screen is a gateway to many of your phone’s features. One such feature is the camera, which is readily accessible for those quick snaps. Having your camera accessible from your lockscreen is handy for a lot of reasons. Personally, I’ve never had any issues with having it there.
Whether for shooting videos that I’ll edit or slow down later or for candid snaps of my kids, I actually really like having the camera app accessible from the lockscreen. For shooting quick snaps, it is invaluable and with things like Night Mode, you don’t even have to think about calibration even when it’s night time.
But not everyone finds this feature useful, though, and if you’re one of those people who want to remove the camera from the iPhone lock screen, you’ve come to the right place. This guide will walk you through the process step-by-step.
Why Remove the Camera from the iPhone Lock Screen?
Before we dive into the steps, let’s understand why some users prefer to remove the camera from their iPhone lock screen.
- Privacy: With the camera accessible from the lock screen, anyone can take photos or videos without unlocking your phone. Removing it adds an extra layer of privacy.
- Accidental Swipes: Sometimes, you might accidentally swipe into the camera, which can be annoying. Removing it can prevent these unintentional swipes.
- Simplicity: Some users prefer a minimalistic lock screen. Removing the camera can declutter your lock screen, making it look cleaner.
Step-by-Step Guide to Remove Camera from iPhone Lock Screen

Follow these steps to remove the camera from your iPhone lock screen:
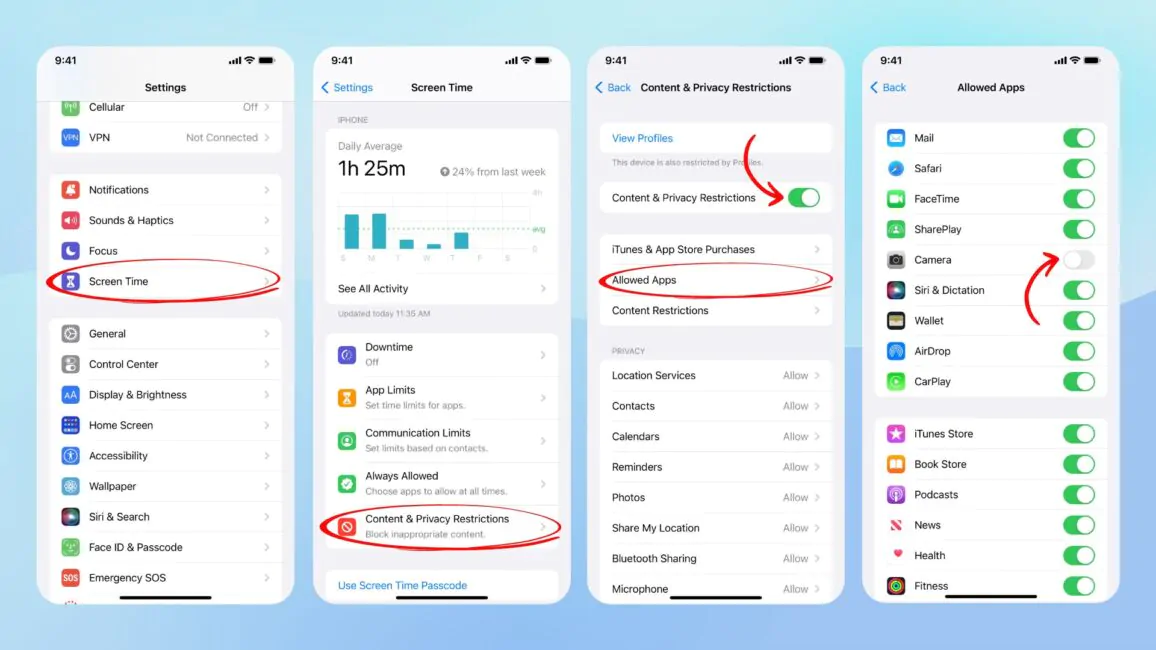
- Step 1: Open the ‘Settings’ app on your iPhone.
- Step 2: Scroll down and tap on ‘Screen Time’.
- Step 3: Tap on ‘Content & Privacy Restrictions’. If asked, enter your Screen Time passcode.
- Step 4: Tap on ‘Allowed Apps’.
- Step 5: You will see a list of apps. Find ‘Camera’ and toggle the switch off.
- Step 6: Exit the settings. Now, the camera should no longer be accessible from the lock screen.
Troubleshooting: Camera Still Appears on Lock Screen
If the camera still appears on your lock screen after following the steps, try these troubleshooting tips:
- Restart Your iPhone: Sometimes, a simple restart can solve many issues. Press and hold the side button and either volume button until the power off slider appears. Drag the slider to turn off your iPhone. After your iPhone turns off, press and hold the side button again until you see the Apple logo.
- Update Your iPhone: Make sure your iPhone is updated to the latest iOS version. Go to ‘Settings’ > ‘General’ > ‘Software Update‘ to check for updates.


