Here’s the three main methods for taking screenshots on the Samsung Galaxy A03s, including the simplest and easiest option.
Taking a screenshot on your Samsung Galaxy A03s is a breeze, but knowing the right techniques can make all the difference. Whether you’re capturing a funny meme, an important email, or a glitch to report, screenshots are incredibly useful.
In this comprehensive guide, we’ll explore various methods to take a screenshot on your Samsung Galaxy A03s. Let’s get started.
Method 1: Hardware Buttons
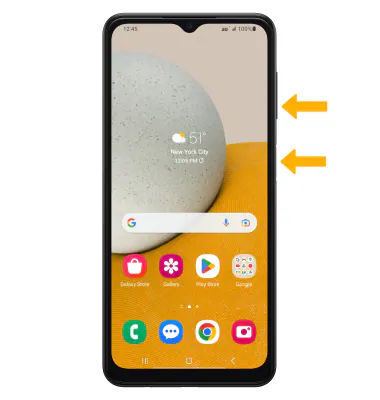
- Step 1: Locate the Buttons: First, locate the “Volume Down” and “Power” buttons on your device. These are usually on the right side of the phone.
- Step 2: Press and Hold: Press and hold both buttons simultaneously for about 1-2 seconds.
- Step 3: Release and Confirm: Release the buttons when you hear a shutter sound or see a flash on the screen. You’ll also see a screenshot notification in the notification bar.
Expert Tip: Timing is crucial. If you hold the buttons for too long, you might trigger other functions like powering off your device.
Method 2: Palm Swipe Gesture
- Step 1: Enable the Feature: Go to “Settings” > “Advanced Features” > “Motions and Gestures” and enable “Palm swipe to capture.”
- Step 2: Perform the Gesture: Place the side of your palm on the edge of the screen and swipe across it.
- Step 3: Check the Screenshot: You’ll hear a shutter sound and see a screenshot notification, just like in the first method.
Note: This method may require some practice to get right.
Method 3: Using Assistant Menu
- Step 1: Activate Assistant Menu: Navigate to “Settings” > “Accessibility” > “Interaction and dexterity” > “Assistant Menu” and turn it on.
- Step 2: Customize Menu: Add the “Screenshot” option to the Assistant Menu.
- Step 3: Use the Menu: Tap the Assistant Menu icon on your screen and select “Screenshot.”
Real-World Example: This method is particularly useful for people who find it difficult to use hardware buttons due to accessibility issues.
Additional Tips: Elevate Your Screenshot Game

You’ve successfully learned the basics of taking screenshots on your Samsung Galaxy A03s, but that’s just scratching the surface. There’s a whole world of additional functionalities and features that can elevate your screenshot experience from basic to advanced.
Whether you’re looking to make quick edits to your captures or you’re interested in sharing them instantly with friends, family, or colleagues, this section is your go-to resource.
Here, we’ll delve into these additional tips, offering you practical advice on how to make the most out of every screenshot you take. So, let’s take your screenshot game to the next level.
- Editing: You can edit your screenshots immediately after capturing them. Just tap on the options that appear along with the screenshot notification.
- Sharing: The screenshot notification also offers a quick way to share your captures. You can send them via various platforms like WhatsApp, Email, or social media.
Where Do the Screenshots Go?
Once you’ve captured a screenshot on your Samsung Galaxy A03s, you might wonder where it goes. By default, all your screenshots are neatly organized and stored in a specific folder named “Screenshots” within the “Gallery” app.
This makes it easy for you to view, edit, or share them later. But that’s not the only place you can find them. If you’re someone who likes to manage files manually, you can also locate your screenshots through the “My Files” app.
Simply navigate to “Internal Storage,” then go to the “Pictures” folder, and you’ll find another folder labeled “Screenshots” where all your captures are stored.
Additionally, from the “My Files” app, you have the option to move or copy these screenshots to other folders or even external storage solutions like a microSD card. This is particularly useful if you’re running low on internal storage space or if you want to create backup copies of important screenshots.
You can also easily transfer these files to your computer by connecting your phone via a USB cable and navigating to the same “Screenshots” folder.
So, whether you’re looking to quickly access your screenshots for sharing or editing, or you’re more interested in file management, you have multiple avenues to find and manage your screenshots on the Samsung Galaxy A03s.
Conclusion
Taking a screenshot on your Samsung Galaxy A03s is simple and straightforward. Whether you prefer using hardware buttons, the palm swipe gesture, or the Assistant Menu, each method has its pros and cons. Choose the one that works best for you.
Remember: Always be mindful of digital etiquette. Don’t capture and share screenshots of sensitive or private information without proper consent.
You’re now well-equipped to take screenshots like a pro on your Samsung Galaxy A03s. Happy capturing!
Buying tools
Thinking About Buying a Samsung Galaxy?
Compare current refurbished prices, see how it stacks up against alternatives, and avoid overpaying for the wrong model.
Recommended for this article